Audience: Android engineers who want to reason about layout like systems designers. If you’ve used LinearLayout/RelativeLayout or Compose’s Box/Row/Column and wonder when ConstraintLayout is the better tool—and why—this is for you.
TL;DR
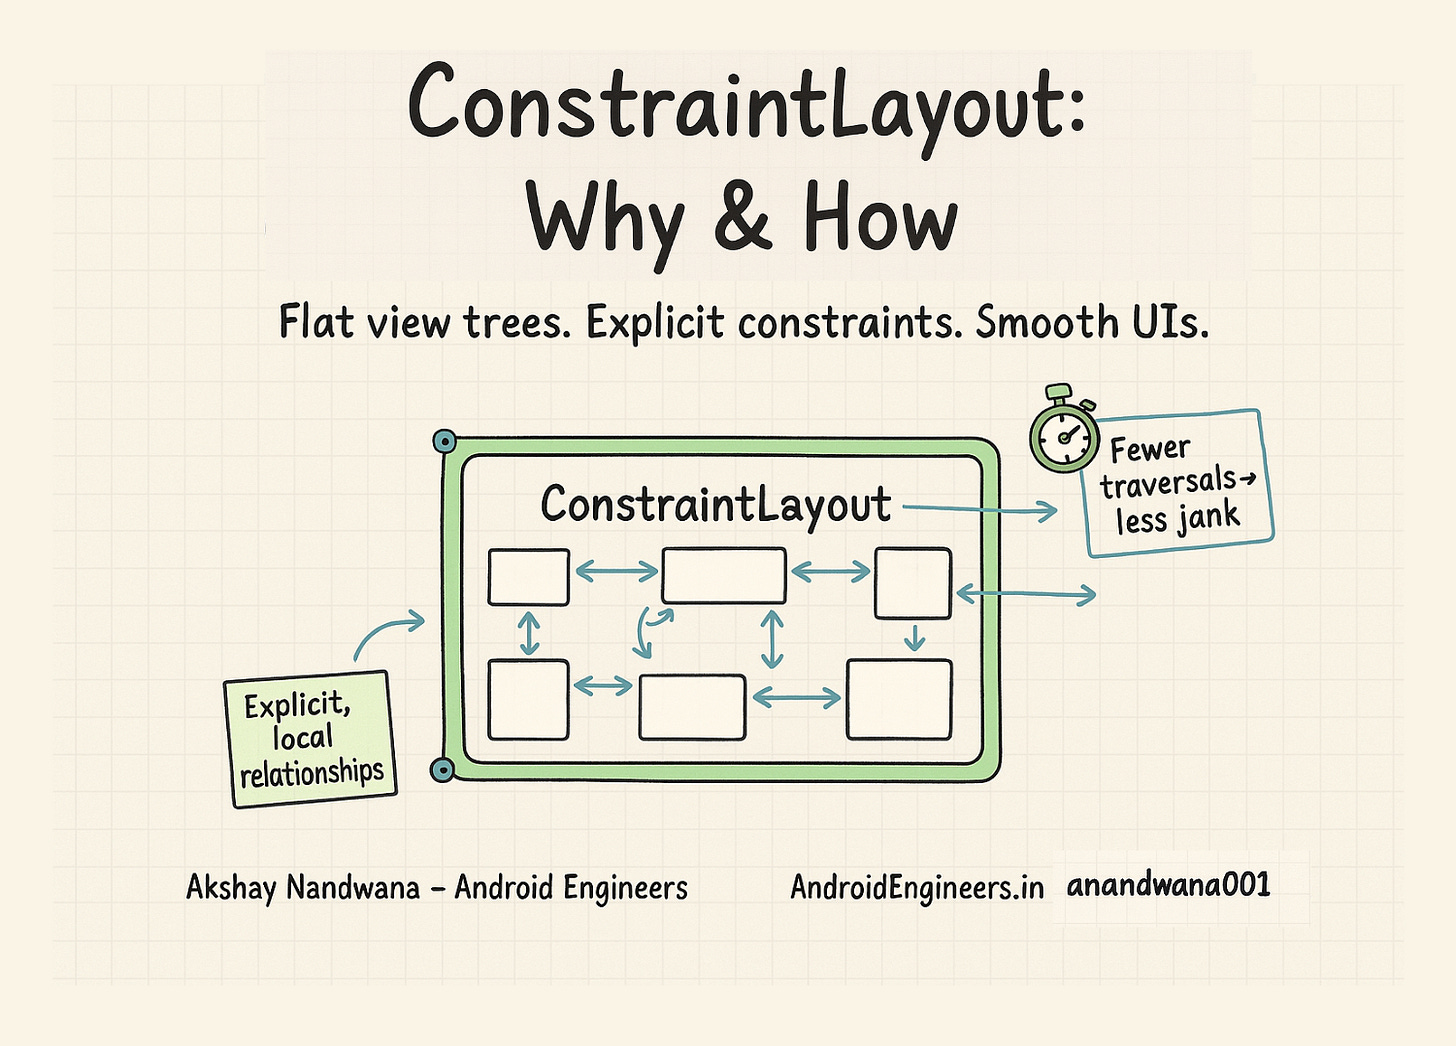
ConstraintLayout lets you model UI as a set of constraints between anchors (sides, baselines) rather than nested boxes.
Internally, it builds a system of linear equations over those anchors and solves them with a Cassowary-style constraint solver, then applies the computed bounds in
onLayout.Use it to flatten view hierarchies, unlock flexible positioning (chains, guidelines, barriers, ratios, bias), and animate with MotionLayout.
In Compose,
constraintlayout-composemirrors the model withConstraintLayout,createRefs(),createGuideline*,create*Barrier,create*Chain, andDimensionAPIs.Don’t overuse it: simple stacks flow better with
Box/Row/Column(Compose) orLinearLayout/FrameLayout.
What is ConstraintLayout?
ConstraintLayout is a ViewGroup (and a Compose layout) where each child declares relationships—“left edge 16dp from parent start”, “baseline aligned to title”, “centered between A and B with 30% bias.” Those relationships (constraints) define position and size; you get complex, responsive UIs while keeping a flat hierarchy.
📚 Docs:
Views: https://developer.android.com/develop/ui/views/layout/constraint-layout
Compose: https://developer.android.com/develop/ui/compose/layouts/constraintlayout
Why Google Built It
1) Complexity without nesting
Deeply nested LinearLayout/RelativeLayout structures are hard to reason about and easy to break. ConstraintLayout makes the relationships explicit and local: tweak one constraint without perturbing the rest.
2) Performance at scale
Every extra layer in the view tree costs you in measure/layout passes and invalidation. A flat tree cuts those costs. Fewer parents → fewer traversals → less jank under scroll/animation.

Core Mental Model
Each child exposes anchors: start, end, top, bottom, baseline, plus center anchors. You connect anchors to other anchors or to the parent. Size is controlled by dimension behaviors:
WRAP_CONTENT: hug content.FIXED: exact dp.MATCH_CONSTRAINT(0dpin XML): fill the space implied by constraints; can be combined with weight, ratio, min/max.
Power features
Chains: align a sequence horizontally/vertically with styles:
spread,spread_inside,packed, with per-item weights.Guidelines: invisible anchors at dp or % positions.
Barriers: dynamic edges defined by the furthest child on an axis.
Baseline alignment: text baselines line up across different font sizes.
Ratios & bias: model aspect ratios and “lean” towards one side.
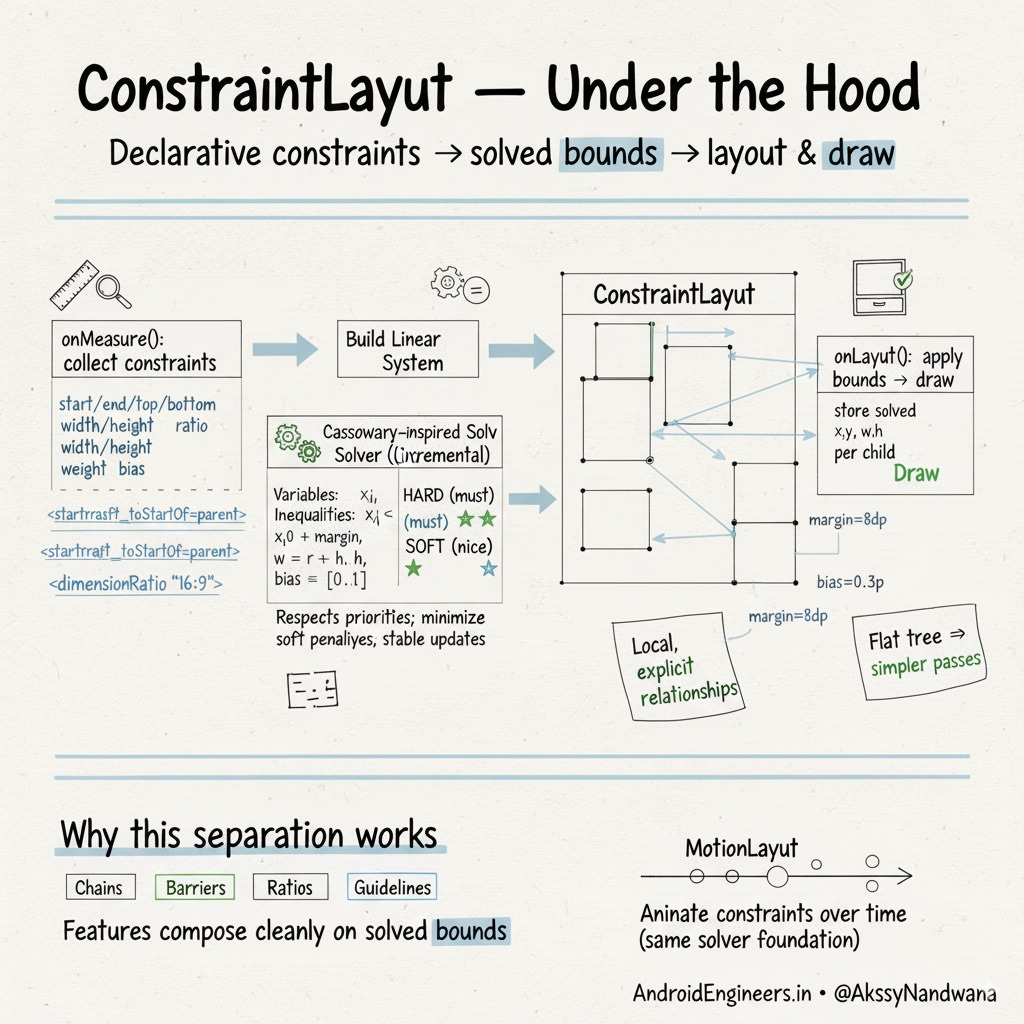
Under the Hood (How it actually lays out)
Collect constraints during
onMeasure().Translate anchors & dimension rules into a linear system of variables (positions) and inequalities (min/max/ratio/weights/bias).
Solve with a Cassowary-inspired incremental solver that respects priorities (hard vs soft constraints).
Compute bounds for each child and cache them.
Apply in
onLayout(); draw is straightforward.
This separation—declarative constraints → solved bounds—is why features like chains/barriers/ratios compose cleanly and why MotionLayout can animate constraints over time.
Practical XML Examples
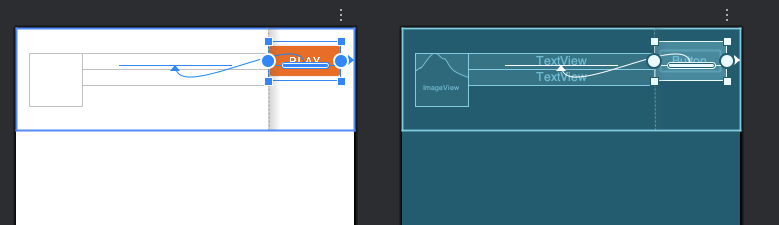
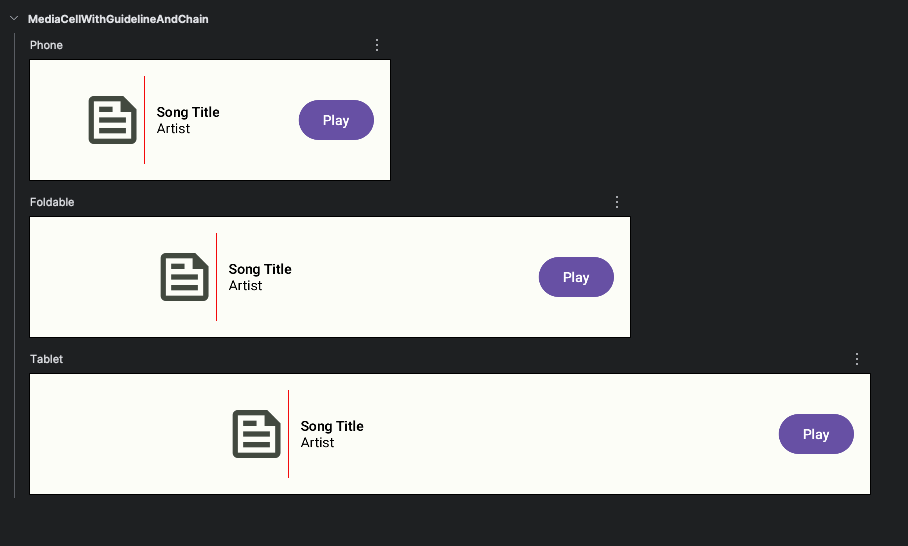
1) A compact “media cell” with image, title/subtitle, and a trailing CTA
<androidx.constraintlayout.widget.ConstraintLayout
    android:layout_width="match_parent"
    android:layout_height="wrap_content"
    android:padding="16dp">

    <ImageView
        android:id="@+id/cover"
        android:layout_width="64dp"
        android:layout_height="0dp"
        app:layout_constraintDimensionRatio="1:1"
        app:layout_constraintTop_toTopOf="parent"
        app:layout_constraintBottom_toBottomOf="parent"
        app:layout_constraintStart_toStartOf="parent" />

    <TextView
        android:id="@+id/title"
        android:layout_width="0dp"
        android:layout_height="wrap_content"
        android:textStyle="bold"
        app:layout_constraintStart_toEndOf="@id/cover"
        app:layout_constraintTop_toTopOf="@id/cover"
        app:layout_constraintEnd_toStartOf="@id/cta"
        app:layout_constraintHorizontal_bias="0"
        app:layout_goneMarginEnd="8dp"/>

    <TextView
        android:id="@+id/subtitle"
        android:layout_width="0dp"
        android:layout_height="wrap_content"
        app:layout_constraintStart_toStartOf="@id/title"
        app:layout_constraintTop_toBottomOf="@id/title"
        app:layout_constraintEnd_toEndOf="@id/title"
        app:layout_goneMarginTop="4dp"/>

    <!-- Barrier that tracks the furthest end of title/subtitle -->
    <androidx.constraintlayout.widget.Barrier
        android:id="@+id/textEnd"
        app:barrierDirection="end"
        app:constraint_referenced_ids="title,subtitle" />

    <Button
        android:id="@+id/cta"
        android:layout_width="wrap_content"
        android:layout_height="wrap_content"
        android:text="Play"
        app:layout_constraintBaseline_toBaselineOf="@id/title"
        app:layout_constraintStart_toEndOf="@id/textEnd"
        app:layout_constraintEnd_toEndOf="parent" />

</androidx.constraintlayout.widget.ConstraintLayout>
Notes:
Image uses
0dpheight +1:1ratio to stay square and vertically center via top/bottom constraints.Barriermakes the CTA adapt iftitlewraps.
2) Two-column layout with a percentage guideline and a packed chain
<androidx.constraintlayout.widget.Guideline
    android:id="@+id/colGuide"
    android:layout_width="wrap_content"
    android:layout_height="wrap_content"
    android:orientation="vertical"
    app:layout_constraintGuide_percent="0.35" />

<TextView
    android:id="@+id/left"
    android:layout_width="0dp"
    android:layout_height="wrap_content"
    android:text="left text"
    app:layout_constraintStart_toStartOf="parent"
    app:layout_constraintEnd_toStartOf="@id/colGuide"
    app:layout_constraintTop_toTopOf="parent" />

<TextView
    android:id="@+id/right"
    android:layout_width="0dp"
    android:layout_height="wrap_content"
    android:text="right text"
    app:layout_constraintStart_toStartOf="@id/colGuide"
    app:layout_constraintEnd_toEndOf="parent"
    app:layout_constraintTop_toTopOf="@id/left" />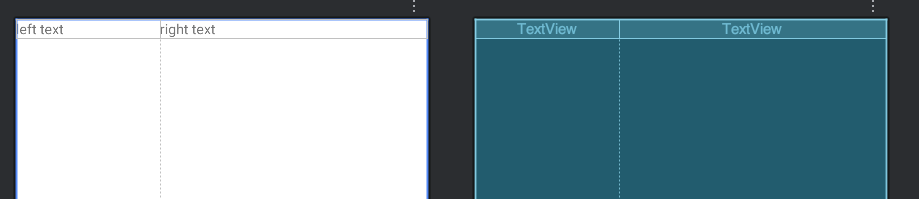
3) Flow helper for dynamic chips (ConstraintLayout 2.x)
<androidx.constraintlayout.helper.widget.Flow
    android:id="@+id/chipFlow"
    android:layout_width="0dp"
    android:layout_height="wrap_content"
    app:constraint_referenced_ids="chip1,chip2,chip3,chip4,chip5"
    app:flow_wrapMode="aligned"
    app:flow_horizontalGap="8dp"
    app:flow_verticalGap="8dp"
    app:layout_constraintTop_toTopOf="parent"
    app:layout_constraintStart_toEndOf="@id/colGuide"
    app:layout_constraintEnd_toEndOf="parent" />
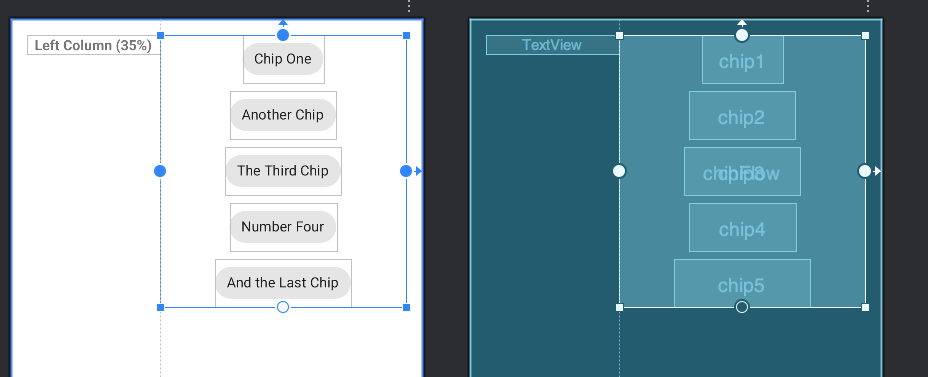
(Add your chips as normal children; the Flow positions them.)
Compose Counterpart
Add androidx.constraintlayout:constraintlayout-compose and use the familiar primitives:
@Preview(name = "Phone", showBackground = true, widthDp = 360, heightDp = 120)
@Preview(name = "Foldable", showBackground = true, widthDp = 600, heightDp = 120)
@Preview(name = "Tablet", showBackground = true, widthDp = 840, heightDp = 120)
@Composable
fun MediaCellWithGuidelineAndChain() {
  val inPreview = LocalInspectionMode.current
  ConstraintLayout(
    modifier = Modifier
      .fillMaxWidth()
      .padding(16.dp)
      .drawWithContent {
        drawContent()
        if (inPreview) { // show only in Preview
          val x = size.width * 0.3f
          drawLine(
            color = Color.Red,
            start = Offset(x, 0f),
            end = Offset(x, size.height),
            strokeWidth = 1.dp.toPx()
          )
        }
      }
  ) {
    val (cover, title, subtitle, cta) = createRefs()

    // 30% vertical guideline = boundary between image column and text column
    val startGuideline = createGuidelineFromStart(0.3f)

    Image(
      painter = painterResource(R.drawable.feed),
      contentDescription = null,
      modifier = Modifier.constrainAs(cover) {
        // Image sits in the first column and ends at the guideline
        end.linkTo(startGuideline)
        top.linkTo(parent.top)
        bottom.linkTo(parent.bottom)
        width = Dimension.value(64.dp)
        height = Dimension.ratio("1:1")
      }
    )

    // Pack title + subtitle vertically as a chain
    createVerticalChain(
      title, subtitle,
      chainStyle = androidx.constraintlayout.compose.ChainStyle.Packed
    )

    Text(
      text = "Song Title",
      fontWeight = FontWeight.SemiBold,
      modifier = Modifier.constrainAs(title) {
        // Text column starts at the guideline; ends at CTA
        start.linkTo(startGuideline, 12.dp)
        end.linkTo(cta.start, 12.dp)
        width = Dimension.fillToConstraints
      }
    )

    Text(
      text = "Artist",
      modifier = Modifier.constrainAs(subtitle) {
        start.linkTo(title.start)
        end.linkTo(title.end)
        width = Dimension.fillToConstraints
      }
    )

    Button(
      onClick = {},
      modifier = Modifier.constrainAs(cta) {
        end.linkTo(parent.end)
        top.linkTo(parent.top)
        bottom.linkTo(parent.bottom)
      }
    ) {
      Text("Play")
    }
  }
}
Chains:
createHorizontalChain(a, b, chainStyle = ChainStyle.Packed)Guidelines:
createGuidelineFromStart(0.35f)Barriers:
createEndBarrier(vararg refs)MotionLayout (Compose):
androidx.constraintlayout.compose.MotionLayout
Performance Playbook
Prefer flat ConstraintLayout over deeply nested stacks when you need cross-axis alignment or bidirectional relationships (e.g., “center between A and B”).
Use
MATCH_CONSTRAINT(0dp) + ratio/bounds to avoid over-measuring heavy children.Avoid
WRAP_CONTENTfor containers of many variable-size children if it causes repeated re-measurement; cap withmin/maxor wrap inside a bounded parent.Keep constraints minimal and non-conflicting—the solver handles soft constraints, but you still pay for ambiguity.
Profile with Layout Inspector & Profileable builds; watch measure/layout durations under scroll/animation.
Further reading:
Understanding performance benefits of flat hierarchies: Android Developers Blog
https://android-developers.googleblog.com/2017/08/understanding-performance-benefits-of.html
Debugging & Tooling Tips
In Android Studio: the Layout Editor’s constraint handles are more than a toy—use them to visualize chains/barriers/guidelines and export clean XML.
Warnings to heed:
“No vertical/horizontal constraints”: you’ll get (0,0) or ambiguous placement. Add at least one constraint in each axis.
Conflicting size + constraints:
wrap_content+ratiowithout0dpwon’t behave as you expect.
Optimization toggles:
app:layout_optimizationLevelon the root can enable solver shortcuts; leave at default unless diagnosing (set tonone) or micro-optimizing specific cases.
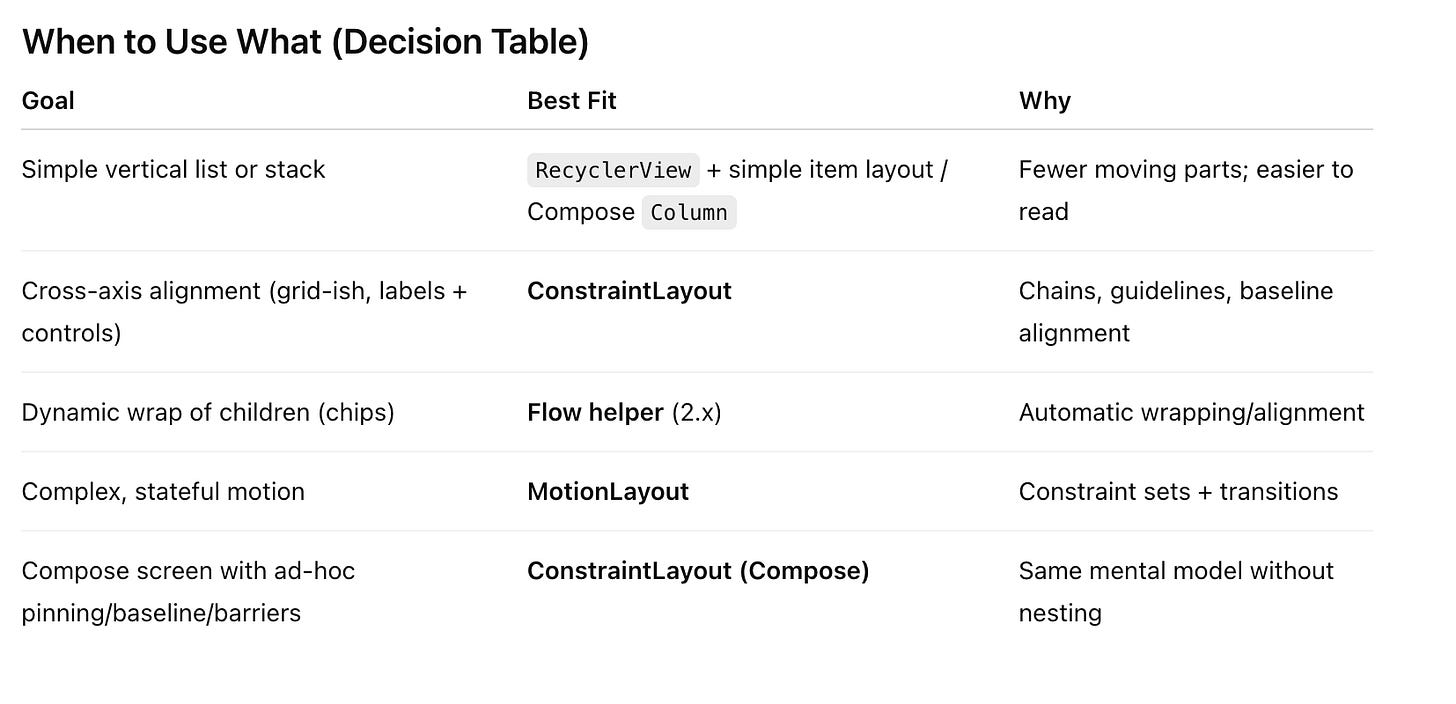
When to Use What (Decision Table)
Migration Playbook: From Nested Layouts to Constraints
Identify implicit relationships in your nested layout (“B is 16dp to the right of A”, “Title aligns with CTA baseline”).
Create a ConstraintLayout root and name your anchors (
@id/title,@id/cta).Port over constraints per view; replace parent–child nesting with start/end/top/bottom links.
Use guidelines for columns/rows you previously approximated with padding/weights.
Replace ad-hoc spacing with chains and bias for more resilient distribution.
Test at extreme sizes (small phones, large tablets, landscape) and adjust using % guidelines and min/max bounds.
Common Pitfalls (and Fixes)
Using
match_parentinside ConstraintLayout
→ Prefer0dp(MATCH_CONSTRAINT) with opposing constraints to let the solver size correctly.Forgetting one axis
→ Every view needs at least one horizontal and one vertical constraint.Over-constraining with exact dp everywhere
→ Leads to fragile layouts. Use bias, ratios, guidelines, and weights.Assuming barriers are static
→ They recompute from referenced views; great for dynamic content, but be careful about cycles.Animating via property animators
→ For constraint-driven animation, MotionLayout is dramatically simpler and more robust.
MotionLayout: Constraints that Move
MotionLayout (part of the same library) animates between constraint sets with declarative transitions and keyframes. Instead of juggling multiple ObjectAnimators, you define start/end states and the engine interpolates positions, sizes, and custom attributes. In Compose, reach for MotionLayout in constraintlayout-compose.
Docs: https://developer.android.com/training/constraint-layout/motionlayout
Compose: https://developer.android.com/develop/ui/compose/animation/motionlayout
Reference Cheat-Sheet
Official Docs
Source & Issues
AndroidX ConstraintLayout: https://github.com/androidx/constraintlayout
Deep Dives & Tutorials
Performance benefits of flat hierarchies (Android Dev Blog)
https://android-developers.googleblog.com/2017/08/understanding-performance-benefits-of.htmlConstraintLayout internals & solver discussion
https://wiresareobsolete.com/2016/07/constraintlayout-part-2/Compose ConstraintLayout samples
https://developer.android.com/develop/ui/compose/layouts/constraintlayout#samplesAdditional tutorials & primers:
GeeksforGeeks overview: https://www.geeksforgeeks.org/android/constraintlayout-in-android/
DigitalOcean tutorial: https://www.digitalocean.com/community/tutorials/android-constraintlayout
Grokking Android thoughts on design editor: https://www.grokkingandroid.com/thoughts-on-constraintlayout-and-design-editor/
Attribution: This article synthesizes concepts from the Android developer docs, the Android Developers Blog, community tutorials, and open-source sources cited above. Links point to original materials for deeper study.
Drop-In Snippets (Copy/Paste Ready)
Ratio poster with full-bleed image capped by min height
<ImageView
    android:id="@+id/poster"
    android:layout_width="0dp"
    android:layout_height="0dp"
    app:layout_constraintTop_toTopOf="parent"
    app:layout_constraintStart_toStartOf="parent"
    app:layout_constraintEnd_toEndOf="parent"
    app:layout_constraintDimensionRatio="2:3"
    app:layout_constraintHeight_min="180dp"
/>
Horizontal chain with weights
<Button
    android:id="@+id/left"
    android:layout_width="0dp"
    android:layout_height="wrap_content"
    app:layout_constraintStart_toStartOf="parent"
    app:layout_constraintEnd_toStartOf="@id/right"
    app:layout_constraintHorizontal_weight="2"
    app:layout_constraintHorizontal_chainStyle="spread" />

<Button
    android:id="@+id/right"
    android:layout_width="0dp"
    android:layout_height="wrap_content"
    app:layout_constraintStart_toEndOf="@id/left"
    app:layout_constraintEnd_toEndOf="parent"
    app:layout_constraintHorizontal_weight="1" />
Compose guideline + chain
val guideline = createGuidelineFromStart(0.4f)
val (a, b) = createRefs()

Text("A", modifier = Modifier.constrainAs(a) {
    start.linkTo(parent.start)
    end.linkTo(guideline)
    width = Dimension.fillToConstraints
})

Text("B", modifier = Modifier.constrainAs(b) {
    start.linkTo(guideline)
    end.linkTo(parent.end)
    width = Dimension.fillToConstraints
})

createHorizontalChain(a, b, chainStyle = ChainStyle.SpreadInside)
Final Advice
Reach for ConstraintLayout when relationships matter more than nesting. Model the UI as a small set of invariants: alignments, ratios, and boundaries. The solver will do the bookkeeping for you—so your layout stays robust as designs evolve, copy changes, and devices stretch from phones to foldables to TVs.
If you want, I can package the examples above into a small sample app (Views + Compose + MotionLayout) with benchmarks and a README you can drop into GitHub.
[Free Download] The Android Interview Cheat Sheet
50 must-know questions with answers — curated by a Google Developer Expert
.png)
Monthly Mentorship
Dedicated mentorship for 1 month where we work together to achieve your specific career or technical goals. Includes 10 sessions in a month, code reviews, continuous chat support, and free access to Jetpack Compose class recordings.
Do you have a major interview due soon but feel unprepared and anxious? Book a 1:1 call with me where I provide step-by-step actionable and practical tips to move past these momentary blocks and ace your next interview. This is a 90 min single session only. You'll receive an email after booking to schedule your 1:1 session.

Get the latest Android development articles delivered to your inbox.